If you’re looking for a quick and easy method to go around, an electric bike, often known as an e-bike, is the best way. E-bikes can be pretty costly, particularly if you already own a bicycle.
You can connect a motorized wheel, whether front or rear, to your current bike or install a drive unit to the bottom bracket. Instead of all these, you can bury a motor under the seat post. Whatever method you choose, your old bike can easily convert into an e-bike.
It will not be easy to implement any of these techniques. The best method will be the conversion kit that you can simply install on your bike without any help from others. A conversion kit can be the best choice if you don’t want to waste money.
Can You Convert A Regular Bike To An E-Bike?
You can easily convert your regular bike to an e-bike, and it’s worth it. There are numerous reasons to add the most powerful e-bike conversion kit to your existing bike. However, it may or may not be worth it depending on your circumstances.
Because it will be difficult to remove many kits once they have been installed, you’ll need to ask yourself whether you want to keep the ability to ride the bike as a ‘normal’ bike.
If you plan to switch between the two (powered and non-powered), you can fold a kit out of the way, but you could choose to simply buy a second bike for convenience.
Essential Things for Conversion Project
Take into consideration that each bike model is unique, so you may find that you require a more specialized tool here and there due to your bike model.
- E-bike motor, throttle
- Speed control hub
- E-bike battery and charger
- Wrench set and pliers
- Gear sensor
- Zip ties
- Bike lock
How to Convert Any Bike to an E-Bike
Here we’ve given a step-by-step guide on how to convert a bike into an e-bike-
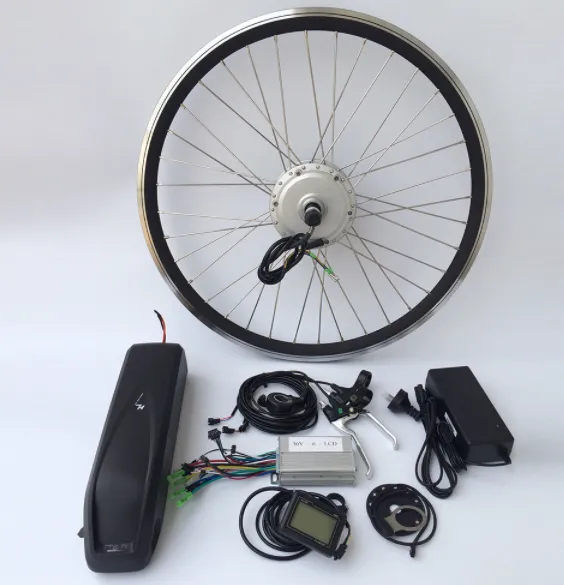
- Selecting Electric Bike Conversion Kit
Using an electric bicycle conversion kit is one of the simplest ways to convert your bike to electricity. Electric bike kits typically include hub motors, speed controllers, and throttles, among other essential components.
Many electric bike kits include additional features, such as LCD screens, and gauges, together with brake levers, so you can make your bicycle even more modern. Make sure you get a bolt-on kit that includes all the necessary parts as well as a step-by-step installation guide.
Each will function as long as they have a wheel that is precisely the same size as your bike’s wheel. Numerous factors, including motor power, determine your conversion kit, overheat prevention, mileage, and budget.
- Mount The Battery Cradle
The battery pack is mounted on the bike’s down tube, locked into a cradle fixed in place by water bottle bolts. You’re good to go if your bicycle has mounting eyelets in the proper area for a water bottle cage.
Just use the low-profile bolts, so the head doesn’t protrude. You should use the bottle-bob clamps when your bike has no water bottle eyelets. These use hose clamps to protect the battery to your frame tubing but instead enable you to position it wherever you choose.
- Remove The Bottom Bracket And Wheel
Remove the old front wheel that will be both fast releases or threaded with nuts by flipping your bike upside down and placing it on the handlebars. To slip the wheel out from between the brake pads if your bike has rim brakes, release the brake wire or puncture the tire.
Both front and back wheels can be removed in the same way. If you’re changing the front wheel, flip the bike upside down. Now disconnect the brake cable, and set the fast release lever to the open position. The bicycle wheel should come off as you pull it.
- Transfer The Tire and Tube to Motor Wheel
Gently peel off the old tire from the front wheel with the tire lever or an improvised lever, cautious not to crush the inner tube underneath. After removing the tire and tube, reverse the process to place them on the hub motor wheel.
This sequence is acquainted with anyone who has ever changed a flat tire. It’s generally the first question we ask to see if someone is confident enough to install their kit.
- Attach The Bracket To The Handlebars
To keep the bracket in place and prevent it from rotating, you must fasten the strap to the bars.
The package also includes some adaptors that you can use if your handlebars are a little narrower. Here will be a few screws to secure the bracket to the bars.
- Install The New Wheel
When you’ve finished, attach the new wheel to the brakes. The procedure should be as straightforward as reversing the removal procedure. You’ll also need to adjust the wheel chain to ensure a tight fit when replacing the back wheel.
Then, using a lever, close the bike’s wire breaks and rim over the wheel to complete the process. If your bike has disc brakes, reinstall the pads and use pliers to secure the clips. Check if the brakes require any technical modifications, such as caliper alignment or brake lever pumping.
- Install The Handlebar Throttle
To attach the thumb throttle to the handlebars, you must first detach the grips and, in some instances, the brake lever. These grips are connected to the handlebars with Allen screws; just remove the screws and slip them off.
Left- or right-handed thumb throttles are available for the thumb throttle. You might also want to loosen and adjust the shifter and brake levers to be accessed easily without squeezing your hand.
Now you need to side the throttle into a place and find the proper location for this. Then place the brake lever and shifter, then fasten them up. Now try to slide the grip back on.
- Connect Other Parts To The Battery
You must connect the power supply to establish the primary electrical system. Assemble the speed controller and throttle after removing the battery from the box.
Ensure you’re connecting the cables correctly, as incorrect connections might result in electric shorts, sparks, and malfunctions. Most companies would make the connection procedure as simple as plugging cables into their appropriate spaces in an ideal world.
- Mount the Motor onto the Bike
When everything is in working condition, it’s time to organize the motor on your bike by mounting it to the appropriate location, such as the bottom bracket or the water bottle holder.
This position is optimal because it evenly distributes the center of gravity between the rear and front of the bike.
You can put the motor in the rear basket or front basket if you believe it is too big to fit on your bike. Nevertheless, you should keep in mind that you may fall off the balance eventually.
- Give A Test Run
It should now be in place to take your first ride on the bike. Examine the cycle one last time to see if any pieces are rubbing together, then go for a ride.
Once you get home, ensure the battery is charged for the first ride and consider purchasing a new bike lock to preserve your asset.
Wrapping Up
There’s nothing more fun than learning how to convert your bike into an e-bike. Our article gives you all the information you need to complete this project. Converting your regular bicycle into an e-bike is the most straightforward and time-saving thing you can do.
If you need to use your bike frequently and commute many routes, then converting your bicycle is the only way. You can install a conversion kit to save extra money as a hardcore rider.