One of the things that makes mountain biking so fun is the technical aspect. There are a number of fundamental skills and the need to reach certain levels of experience and technique.
Knowing the best method to deepen your biking skills has always been and continues to be a real challenge for experienced or less accustomed riders. But it’s important to pay full attention and learn why riding MTB bikes are quite different from other types of road bikes.
Why is it important to improve your MTB technical capabilities?
In my experience, there are 3 reasons that should make you reflect on the importance of spending part of your time deepening the skills already acquired.
1. Greater security
Let’s face it, mountain biking can be dangerous. The tracks often present obstacles that are not foreseen that for a neophyte can bring significant problems, such as a stone or a root that you just had not seen…
If you can be more confident of yourself, relaxed, and balanced, you can handle unexpected situations with a smile and you can make important decisions in a very short time.
2. Greater speed
By increasing your physical performance and improving your posture on the bike, you’ll get more momentum. This translates into less speed dispersion and a good start on the track.
3. Increased resistance
Another advantage of keeping your momentum on the trail better is that you don’t have to pedal too much to compensate for speed loss. This means you’ll treasure the energy you’ll have to spend later, so you can push harder and increase your running performance.
Not least, in addition to these 3 most practical reasons, there is also the “cool” factor. Having some more skills makes us feel better and more positive… the emotional side should never be underestimated!
Skills to increase MTB technical capacity
So you’ll agree with me that improving your skills is an important part of increasing performance and fun on the track. But what is the best way to do this?
Some tips that perhaps you haven’t yet considered:
1. How to Track stand: The technique
In mountain biking, the ability to adapt to the continuous variables of the route is a fundamental discriminating factor to face with ease, and with a large margin of safety, routes characterized by technical difficulties that for many are insurmountable.
Even if it seems a contradiction, learning to stand still and balance standing on the pedals is fundamental, especially in those technical downhill passages that force the biker to make continuous speed changes.
How do I run it? The feet must be parallel to the ground; or rather the feet must be at the same height, and not one up and one down. The pressure must be exerted on only one foot, usually, the one you hold in front of you during the descents.
How to do it
If by nature you have your right foot forward, this means that you will need to load your right foot, like to start pedaling. The load will tend to tilt the bike to the right.
To compensate, you’ll steer to the left, and load the handlebar with your arms to ensure that this “compensating” force generates a tilt to the left.
At this point, if you’re falling to the right you’ll move your body weight slightly forward to load your arms more and then increase your strength to the left to straighten you up.
Vice versa, if the center of gravity is moving to the left, I will go back and load the pedal more in order to restore balance.
Keep in mind that these are small movements, never too abrupt. The higher your balance, the fewer corrections, and movements you need to make. Always try, even in the city, to stop at a traffic light for example. You will not get the first, not the second, but you will persevere.
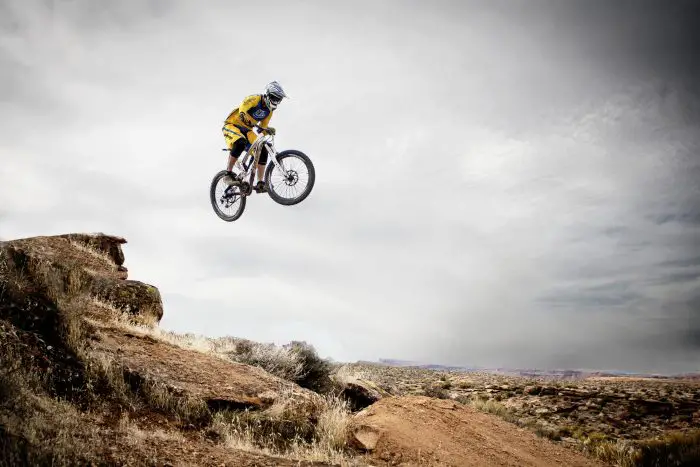
2. How To Bunny Hop
The bunny hop is the technique used to jump over obstacles that are even very high.
How many friends do you know who can make a bunny hop?
This is because being a technique not easy to perform and learn, in the normality of excursions between friends is almost unused.
It’s good to know, however, that if you decide to commit yourself to learn it your fun factor will learn a lot.
Of course, bunny hop is not a delicacy or an end in itself, useful to snatch some applause, but enters fully into the things to do the courses of the masters of mountain biking.
Getting Started and Perfecting:
i). Get close to the obstacle at a good pace, about 15-20 km/h, positioned on the front of the bike, arms and legs bent, tilted bust, ready to launch into a dynamic extension backward.
ii). At 2 or 3 meters from the obstacle depending on the speed, stretch backward pulling strongly on your arms, pushing at the same time on your legs to soak and bring the front wheel higher than the obstacle.
iii). With the front wheel at the level of the obstacle, lie firmly upwards with your legs and straighten.
iv). At the level of the obstacle continues the extension and climb the MTB with your feet, if the thrust was enough the bike bounces naturally without pulling with the attacks of the pedals, the cranks always remain horizontal.
v). To make it easier to get past the bike, push the bike forward by stretching out your arms and moving behind the saddle.
vi). Landing is carried out gently on the front wheel, cushioning with legs and arms.
Important to know: to control this gesture well, it is preferable to learn with flat pedals, starting on smooth ground and overcoming small obstacles such as branches and stones.
Don’t worry: If you use quick-release pedals, don’t pull them up to raise the bike back, weight shift and timing are the only keys to success.
Is that difficult in words? We facilitate your understanding with a well-done English tutorial.
As you well know, nothing can be learned immediately; perseverance pays off, and to have complete control of bunny hop you need systematic and gradual training (from branches a few centimeters high to benches up to a meter and higher).
3. The position of the body
Your body position on the bike is really important and is one of the key factors to consider. It directly affects the bicycle’s contact with the ground (through the wheels) and, obviously, what is sought is to be in the best possible position to face any obstacle that appears on the road.
The attack position
When the trail is flat, you’ll most likely be sitting on the saddle, but in an ideal world, it’ll start to get a little more technical (i.e. bumpy).
To make sure you’re in the ideal position when this happens, you should:
- Stand on the pedals so that your body weight falls on both wheels.
- Keep your pedals at the same level when you are not pedaling (i.e. without one foot higher or lower than the other) to avoid snagging or hitting.
- Keep your arms and legs slightly bent at your elbows and knees to better absorb potholes.
- Look ahead as far as you can: this is possibly the MOST important point!
- Keep your fingers on the brakes, ready to brake at any time.
4. How to brake
I’m sure you already know HOW to stop, but the skill you’ll need to learn is how to apply it. When driving on unmarked terrain, the rule is not as simple as braking when you feel like it.
The best way to perfect your technique is to practice on a path you know so you can get used to the feel of your brakes.
There are a number of really important things to remember:
i). Learn which is the front brake and which is the rear brake. If you don’t know, pedal a little and press one of the brake levers slightly: if the rear wheel starts to slip, that’s the rear brake, and if the bike stops (and the rear wheel may even lift if you go fast), then that lever will match the front brake.
ii). As you can see, the front brake does most of the braking. As a beginner, it is best to use both brakes at the same time. Although the front brake is the most powerful, it’s vital that you don’t push it too hard.
iii). Avoid squeezing the brakes too hard: apply pressure gently, especially at first.
iv). Choose where to brake: it is advisable not to brake in technical areas of the trail, but rather to enter these sections at a safe speed (in other words, to break before reaching them) and to find a suitable point where to brake afterward. Remember that a moving wheel holds on to the ground better than one that is braking!
5. How to cope with uphills
In the attack position, your weight falls on the middle of the bike, helping to improve the grip of both the front and rear wheels. However, as you ascend you will need to adapt your body posture to ensure that weight remains central.
- When climbing a hill with your bike, you will need to lean forward to keep the weight on the front wheel and retain the grip of the bike on the ground.
- How much you lean will depend on the slope of the slope, but if you notice that the front wheel is raised a little, you are not leaning forward enough!
- It is also important to change to an easier gear BEFORE starting the climb!
- And more importantly, remember to look ahead and keep pedaling!!
6. How to face the descent
When the path points downwards, it is essential to make certain body adjustments in order to cope with the descent in a controlled manner:
- When facing a descent on a bicycle you will need to tilt your weight backward.
- Again, how much weight to tilt back depends on how steep the drop is?
- You should stand on your pedals, with your arms outstretched and your saddle in front of you, your pedals at the same level, your toes on the brakes and always looking ahead!
- If you need to brake to slow down, remember to squeeze the brake levers slightly.
7. How to take the curves
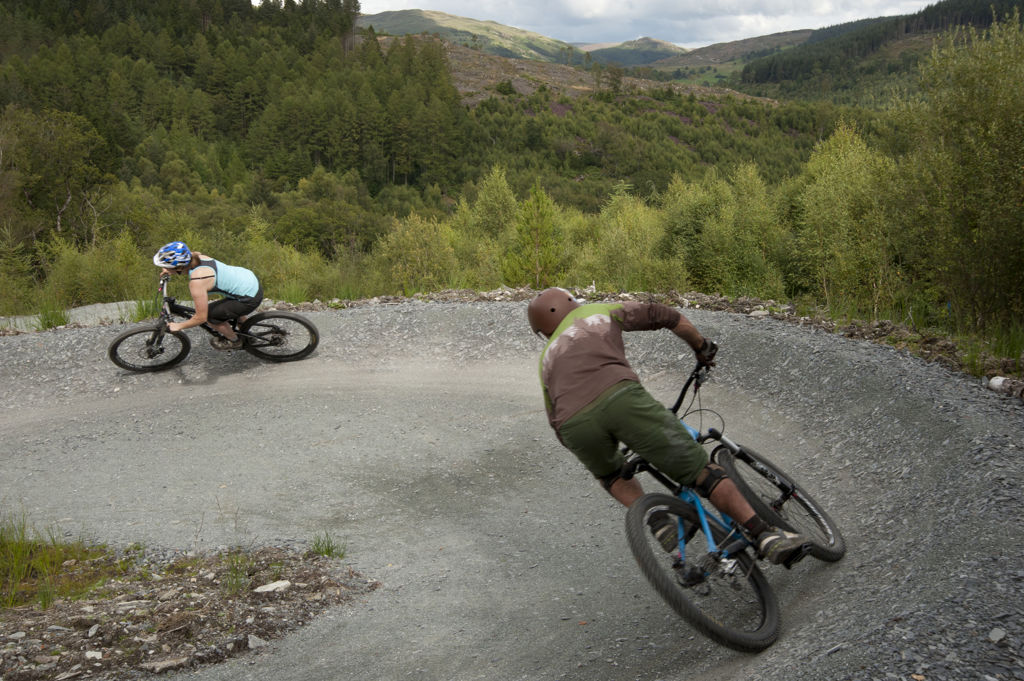
Theoretically, anyone can take a bike turn, right? Not so easy! Curves are one of the most demanding and difficult to master cycling skills.
Looking ahead is important
There is a golden rule that will make your life a lot easier when you take a bike turn, whether you are a beginner or an expert.
And the rule is this: LOOK FORWARD. It’s one of the easiest skills to learn but also one of the easiest to pass up; and the truth is, it really makes a difference.
As you enter the curve, you will look to the side and turn your head, and this movement will also move your shoulders. And by combining this with the handlebar rotation, you’ll almost be guiding your bike around the bend. This “around the corner” gaze action may seem a little strange at first, but stick to it!
The basic steps to becoming a true biker
The development of specific skills can make your next technical trip safer and more exciting. Like any sport, mountain biking is based on the specific skills and abilities that can be tackled individually when you are off the track.
Starting a regular routine to improve your skills gives you a good opportunity to take them to the next level. Practice and patience will allow you to advance in sports.
1. Experience different riding styles
The feeling of turning on a new trail for the first time is simply priceless. There are no more excuses for not leaving home and tasting something different. Do you want a trail full of flow, full of banks and jumps? So try a bike park!
2. Take part in a competition

Racing on your mountain bike is a completely different experience than a simple ride: you can also compete on your routes, on your bike, and with your friends, but adding a stopwatch changes everything. It pushes you to give your best and involves you in a deeper way than any exit in the company.
3. Follow a Live event
The movement with clawed wheels is wide and structured; in essence, you never get bored!
There are plenty of opportunities to get informed by spending a pleasant time, from fairs to festivals through free ride videos. But the best way to experience mountain biking on the sofa at home comes from watching the Live World Cup.
4. Spend time on the bike more often
One of the best ways to improve your confidence is to simply spend more time on the bike. You will learn to know your MTB in every single detail and quickly find the right feeling.
Riding more means also tackling different types of terrain which, over time and challenge after challenge, will also contribute to bringing your driving technique to a higher level.
Do not be scared of rock gardens, root beds, muddy, steep sections, etc. You just have to isolate them from the rest of the pedaling and focus individually on them, without rushing … it’s not a cross-country race to be tackled, it’s about going safer and having fun!
5. Work on the basic technique
Never think of being “learned”! Even if you are a biker of at least a good level, return periodically to work on fundamentals, to correct any shortcomings and defects, or simply old hard habits to die.
Having the opportunity to shoot in Pump Track or on a Flow path, allows you to focus on individual skills and progress, both for technique and safety.
The next level is filming with friends, even with the smartphone without having an action cam or professional equipment: take a certain step, as you are put on the bike, and you will immediately understand where and how to act.
6. Take care of the MTB setup
Start by adjusting the controls and supports — handlebar and saddle — to finish with the suspension setup.
After these real fundamentals that no biker should neglect, you can move on to the next level: choose the right tires based on your driving style and the terrain you most frequently deal with.
Better a tire with more grip than a more flowing one, which will give you that extra safety in traction and lateral hold to push your limits further, with the maximum naturalness possible.
7. Follow an MTB course
It’s true, first, we told you that you’re no longer in school, but sometimes the best way to become more confident is to participate in a driving course taught by a capable and prepared teacher who will be able to “read” your weaknesses in MTB and will eliminate them to make you a better, more determined and confident biker on their own vehicles.
Practice makes the teacher
Of course, the additional technique that will unite all these skills is practice. The only way to learn is to ride your bike and test your new skills: only then will they become absolutely natural. You’ll learn what you can do and the areas where you need some work!
If something doesn’t work as you expected, don’t let it get to you or discourage you: consider it a valuable lesson!
It will allow you to think about what went right and what went wrong, as well as what you can do differently next time. And remember that in MTB there will always be unpredictable elements…. sometimes just “things happen”, but that’s why it’s so much fun!
The importance of the coach
Hopefully, these tips will help you get off to a good start in the MTB world. Or they may allow you to rethink your core skills, but in the end, there is nothing better than the practice and learning you will gain from a qualified coach.
A trainer will be able to evaluate where you are and offer you personalized advice to improve your technique.
Wrap Up
Practice is also a great way to retain new knowledge and there is certainly nothing better in MTB than MTB itself, but it is important not to learn bad habits! And remember that there are probably also several clubs in your area that will host cyclists of all levels.
In short, the best way to learn is to go slowly but steadily and go out and shoot as much as you can!