If you want to be safe with the mountain bike on the terrain and on the trail, you cannot avoid the topic of riding techniques. This will allow you to enjoy your ride, arrive at your destination with a lot of flow, and fun, and, above all, safely back down.
You should have the necessary know-how in terms of riding techniques. In this interesting article, I would like to briefly explain the basics and give you some tips to learn them:
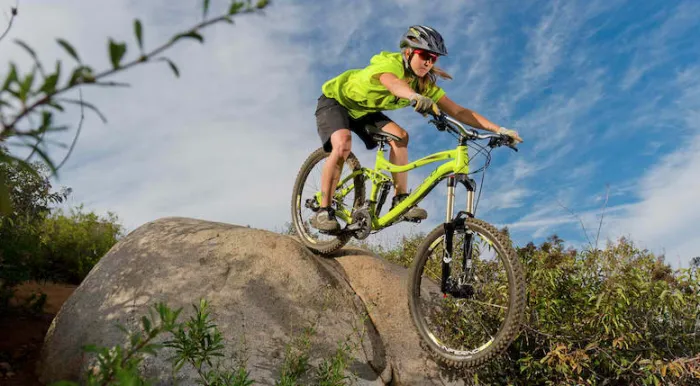
Basic position on the MTB
First and foremost, you should know how to properly ride the bike. Because from this basic position, all other movements go out later:
- Horizontal pedal position
- Even distribution of body weight on both pedals
- Knees and elbows are slightly bent to cushion bumps and bumps
- The center of gravity is centered above the bottom bracket
- The back is straight
- The face should be approximately over the stem are
- To be ready to brake, the index fingers are on the brake levers
- The view should be directed a few meters forward on the trail/road.
The basic position of mountain biking is to sit up straight from the saddle and balance your body weight evenly across the two distribute standing pedals.
The knees buckle slightly to better cushion shocks. The hands grip the handlebars firmly, the index fingers are always ready for use on the brakes.
The elbows point outwards. If you hold this position properly and train before your first ride, it will not be a problem for you to maintain balance after a short time.
Tip: Film your performance every now and then. This will enable you to see the areas you may have to improve upon!
Mountain bike driving technique for uphill and downhill
If you just sit comfortably in the saddle as a “passenger” and the bike does all the work, then ultimately the flow stays on track and a fall is inevitable.
Also, the person driving technique level will not be improved in this way. Therefore, it is important to shift the weight depending on the situation:
Weight shift when Uphill
- Choose the right gear before the climb to get around. This should not be too easy if you have to change the cradle kick!
- In front of steeper ramps in the saddle step on time to take the momentum
- Shift the center of gravity as far forward as necessary
- Arms bend so that the upper body is deep and shoulders above the handlebars are
- If the rear wheel slides through, the center of gravity must be shifted slightly to the rear
- On the other hand, if the front wheel rises, the center of gravity, i.e., the upper body, must be brought a little further forward
Tip: If you cannot handle the lift with the front wheel, you should consider checking the seat geometry and, if necessary, the purchase another stem. Experts in the shop are happy to help here.
Weight transfer during downhill
- The view always goes in the direction of travel!
- Bend knees and elbows slightly to shift the center of gravity downwards
- Only shift the center of gravity to the rear wheel as much as absolutely necessary
- On steep slopes, stretching the elbows and flexing the knees further shifts the weight to the rear wheel
Attention: Often you can see that a biker has brought his center of gravity too far back, so the driver is almost sitting on the rear tire. With such an “anxiety position” hardly any pressure on the front wheel is brought and maneuvering is difficult – which can ultimately lead to a fall!
Right brakes with the MTB

If you know the weight transfer so far, it is the right brake’s turn. Often it can be observed that only the rear brake is decelerated – although the front brake can be significantly delayed with a little practice much more effective!
Tip: Take a closer look at your brake pads at the next change. If the back pads are much more worn than the front ones, you should revise your brake technology!
How to brake properly in the terrain:
- Take a home position – with one finger on the brake lever
- Simultaneously and dosed operate both brake levers
- To avoid a rollover, shift the center of gravity slightly downwards and to the rear
- If possible, distribute the weight evenly over both wheels to prevent uncontrolled locking
Note: The deceleration is greatest at the point where the wheels are about to lock!
Tip: Note the lever rule! To get the maximum braking power, adjust the brake lever to the size of your hands with the reach adjustment. So you can take advantage of the optimal braking force!
If you master the basic position, it is important that you also brake and steer properly – what seems like a commonplace, but is crucial to biking safely through the area.
Contrary to the custom of many bike riders, you never brake with your whole hand while mountain biking. Instead, one uses only the index fingers for the operation of the front and rear brakes. There are several reasons for this:
i). If you use several or all fingers, you risk not having the handlebars firmly in the grip.
ii). In addition, the braking process with a finger is much more emotional and can be better dosed.
iii). Always apply both brakes equally and shift your weight backward to avoid loss of control.
Proper steering also needs to be learned. In the mountains, you will often encounter tight bends. Combined with steep gradients and high speeds, this can quickly lead to difficulties.
In order to drive the tightest possible radius of curvature, it is advisable to push the handlebar in the appropriate direction and to corner the bike as in motorcycling. However, do not overdo it and risk losing control.
The right driving technique when cornering:
- Adjust the speed before the turn.
- When entering the curve, look at the corner exit or even better at the next corner or obstacle
- In the curve, the inside arm is only slightly bent, but the outer arm is angled
- The leg position is exactly opposite, so the knee bend only slightly bent, the inner bent more
- The pedal position is according to the leg position – so the outside pedal shows down
- The center of gravity is centrally over the bike to bring enough pressure on both wheels
- Set up at the corner exit and drive out of the curve!
Anyone who buys a mountain bike is thus in good hands in difficult terrain. Logically, you occasionally encounter greater obstacles or heels that must be overcome. With the right technology, you succeed without having to get off the bike.
Overcoming an obstacle is also called a “bunny hop”. If you see an obstacle, follow these steps:
1. Bring your body to a horizontal position.
2. Knees and elbows are strongly bent.
3. Be especially ready to brake.
4. Focus your gaze on the obstacle.
5. Jump off at the right moment (this feeling develops with your mountain bike experience).
6. Stretch legs jerkily, straighten up the upper body and pull the handlebar upwards, the rear wheel pushes forward and the front wheel lifts off.
7. Shifting the weight forwards (to avoid falling backward).
8. Push the handlebar forward at the highest point of the jump, and the rear wheel lifts off.
Momentum and timing are important factors in getting over obstacles and steep climbs in the field. What is meant is that you always choose the right posture, speed, and translation. The goal is to be as relaxed and smooth as possible on the trail, whether mountain or mountain. The biggest mistakes are missing speed and wrong gear selection.
To drive a heel (or a staircase) correctly, it is important to shift the weight strongly backward. Shocks are cushioned by the fork of the mountain bike and knees are bent.
The perfect shift of the center of gravity can be achieved by pushing the butt backward and building up a strong body tension. Brake lightly and evenly to maintain control of the MTB, and normalize your posture only when the rear wheel is back on one level.
No master has fallen from the sky yet. So do not let it demotivate you if one of the techniques presented does not work right from the start.
The recipe for success is simple: practice, practice, practice. It is usually the experience that makes a good, really good mountain biker. But even if you master all the techniques from the outset, it is always: safety first. Helmets and protectors for joints, shins, and Co. are an absolute must when MTB biking.
Wrap Up
No matter which technique you want to train on the mountain bike, start slowly and feel your piece by piece to the limits run.
Start on a suitable parking lot or a meadow and set up an exercise course, for example, to learn the cornering technique. Only then you can try the learned on a trail! Various providers also have courses or even driving technology camps in the program. Training is the master!
